|
I dry gourds in my basement where it is cool and provides a space to store them. You can hang the gourds for drying or lay
them on the floor. If you place them on the floor you must turn them several times during the drying period.
The gourds
will form a mold or discoloration while they are drying. As long as they remain firm they are just fine. If one should soften,
throw it away. Allow them to dry until they are hard and you can hear the seeds rattle when you shake the gourd.
PREPARING THE GOURD
Step 1: To remove the mold and discoloration you must scrub the gourd with a stiff brush. It helps to soak the gourd in a
bucket of mild bleach water for an hour before scrubbing. You will have to weight the gourd down in the water because it
will want to float. I use a heavy iron pot to hold the gourd down in the water.
Step 2: Cleaning the inside of the gourd.
After the gourd has been cleaned and thouroughly dried the gourd may be cut with an X-acto knife or I use an X-acto knife
to puncture the gourd so I can insert the blade of my Micro saw that gives me a smooth clean cut.
Mark the gourd
with a pencil where you want to cut it. I use a handy little adjustable pencil support that I found at the gourd show to
mark the ring around the gourd for cutting a lid. You can also accomplish this by laying a pencil on top of a can or something
that is approximately the right height for marking the gourd and turning the gourd while the pencil draws a line around the
gourd.
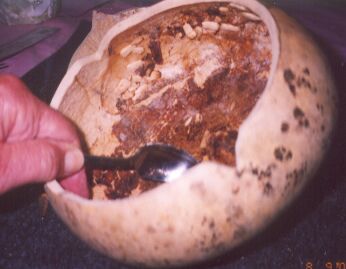
Once the gourd is cut open the seeds and inside pulp must be removed. For a birdhouse, shake the
seeds out of the hole...some of the pulp may remain inside for the birds to use in their nest. For an open bowl all the seeds
and pulp must be removed and the inside sanded smooth.
Step 3 Finish The Gourd
Now you are ready to
add a design to your gourd with a pencil then paint, stain or woodburn your design. Allow finish to dry and then add a protective
coat of wax, shoe polish or clear varnish. Finish your project with any added hardware, trims etc.
|
 |
|
Note: I do not grow gourds so I cannot answer any questions you may have about the growing
process.
You will need some basic tools to clean the gourd. I find that a grapefuit spoon works very well
for scraping the inside. Use course textured sandpaper to smooth out the inside of the gourd.
An X-Acto knife if essential
for cutting.
An Electric Drill will aid you in making holes in very thick gourds.
For a good bonding glue,
I like to use Liquid Nails.
|
|
|
|
|
The hole size in a birdhouse varies according to the type of bird you want to attract. Check the information in Gourd Central
Website to find the dimensions. (See Related Links page.)
|
|
|
|
|
|
|
|